通过 WireGuard 组建虚拟局域网 实现多个局域网全互联【进阶篇】
前言
基础篇
如果你只是想要在外面连回家里的局域网,可以移步基础篇,使用 wg-easy 进行部署,更加的简单。
上一篇 WireGuard 的教程通过 Docker 安装wg-easy 的形式来使用 WireGuard,但 wg-easy 的功能比较有限,并不能发挥出 WireGuard 的全部功力。
而对于想要把多个地方的局域网组成一个大的虚拟局域网的用户来说,wg-easy 就有些力不从心了。对于这部分用户来说,网上大部分教程都是在 OpenWrt 设置 WireGuard 进行组网,而今天介绍的是在 Linux 上直接启动 WireGuard 来实现多个局域网全互联。
wg-easy 优缺点
wg-easy 作为开箱即用的工具,WireGuard 的配置文件对于用户基本是透明的,只需要在启动 Docker 容器时,设置好相应的环境变量,直接在 Web UI 中添加设备,然后扫码或者导入自动生成的配置文件就可以完成连接,非常的简单易用。
正因为配置文件对于用户透明,如果有更多的需求,想要手动修改部分配置,就变得非常的困难了。
配置文件
提示
本文只会介绍必须的配置,更详细的配置可以看这位大佬的文章
在开始之前,我们需要了解 WireGuard 的基本配置,WireGuard 的配置文件采用的是 ini 的语法,文件命名格式为 <接口名>.conf,默认路径是 /etc/wireguard/wg0.conf
配置文件分为 [interface] 与 [Peer] 两部分,其中[Interface] 定义的是本地节点的配置,[Peer] 定义的是对等节点的配置(也就是要连接的远程节点)
[Interface]
Address:单个 IP 地址或整个网段
- 常规客户端:例如手机、笔记本,可以设置为单个 IP 地址
Address = 10.8.0.2/32 - 中继服务器:例如软路由、NAS,可以设置为整个网段
Address = 10.8.0.1/24
- 常规客户端:例如手机、笔记本,可以设置为单个 IP 地址
PrivateKey:私钥
ListenPort:监听端口,默认为 51820,常规客户端无需配置
PostUp:启动接口后运行的命令
ini# 添加 iptables 规则,启用数据包转发 PostUp = iptables -A FORWARD -i wg0 -j ACCEPT; iptables -A FORWARD -o wg0 -j ACCEPT; iptables -t nat -A POSTROUTING -o eth0 -j MASQUERADEPostDown:停止接口后运行的命令
ini# 停止后删除 iptables 规则,关闭数据包转发 PostDown = iptables -D FORWARD -i wg0 -j ACCEPT; iptables -D FORWARD -o wg0 -j ACCEPT; iptables -t nat -D POSTROUTING -o eth0 -j MASQUERADE
[Peer]
- PublicKey:公钥
- AllowedIPs:路由转发的目标地址
- 常规客户端:可以设置为自身 IP 地址
Address = 10.8.0.2/32 - 中继服务器:可以设置为虚拟局域网的网段和所在内网网段
Address = 10.8.0.1/24, 192.168.1.0/24 - 中继服务器:还可以设置为
AllowedIPs = 0.0.0.0/0,::/0,转发所有的流量
- 常规客户端:可以设置为自身 IP 地址
- Endpoint:节点的公网 IP,一般只需指定中继服务器的 Endpoint
Endpoint = ddns.domain.com:51820
安装 WireGuard
Linux 内核版本大于等于 5.6,系统自带 WireGuard,只需要通过以下命令安装 wireguard-tools 即可
apt install wireguard对于低内核版本的安装 WireGuard 过程非常繁琐,有兴趣的可以自行搜索教程
安装 wg-gen-web
wg-easy 不能自定义配置,而手搓配置文件,客户端一多又非常的繁琐,这次用到的是另一款 WireGuard 的可视化工具 wg-gen-web
通过以下 Docker 命令直接启动
docker run --rm -it -v /tmp/wireguard:/data -p 8080:8080 -e "WG_CONF_DIR=/data" vx3r/wg-gen-web:latest也可以通过 Docker Compose 启动
version: '3.6'
services:
  wg-gen-web-demo:
    image: vx3r/wg-gen-web:latest
    container_name: wg-gen-web-demo
    restart: unless-stopped
    expose:
      - "8080/tcp"
    environment:
      - WG_CONF_DIR=/data
      - WG_INTERFACE_NAME=wg0.conf
      - SMTP_HOST=smtp.gmail.com
      - SMTP_PORT=587
      - SMTP_USERNAME=no-reply@gmail.com
      - SMTP_PASSWORD=******************
      - SMTP_FROM=Wg Gen Web <no-reply@gmail.com>
      - OAUTH2_PROVIDER_NAME=github
      - OAUTH2_PROVIDER=https://github.com
      - OAUTH2_CLIENT_ID=******************
      - OAUTH2_CLIENT_SECRET=******************
      - OAUTH2_REDIRECT_URL=https://wg-gen-web-demo.127-0-0-1.fr
    volumes:
- /etc/wireguard:/data生成配置文件
- 访问 http://ip:8080,进入 SERVER 中设置全局配置
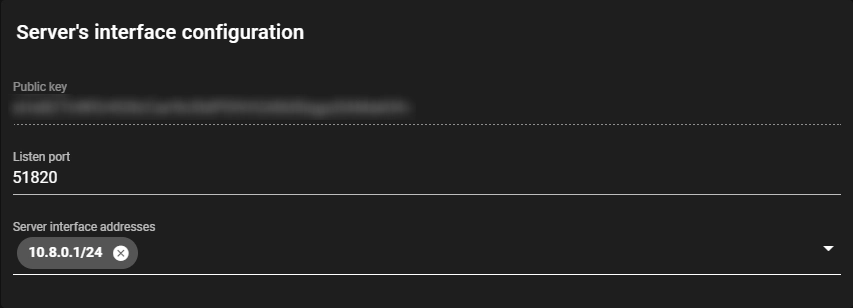
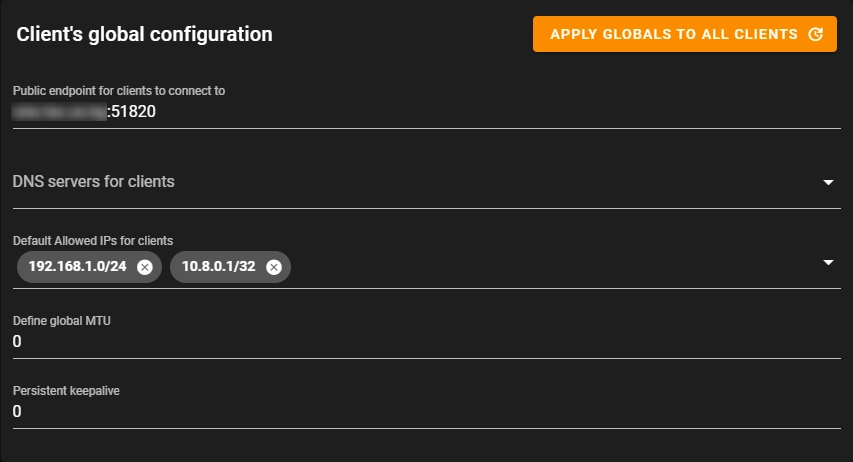
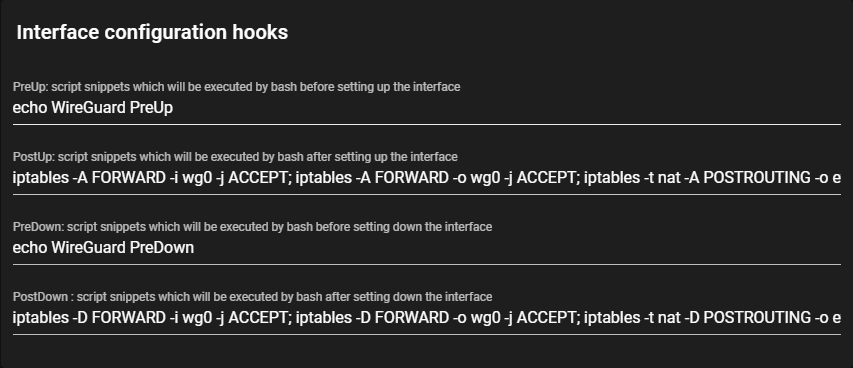
- 返回 CLIENTS 中添加节点,勾选 Enable client after creation
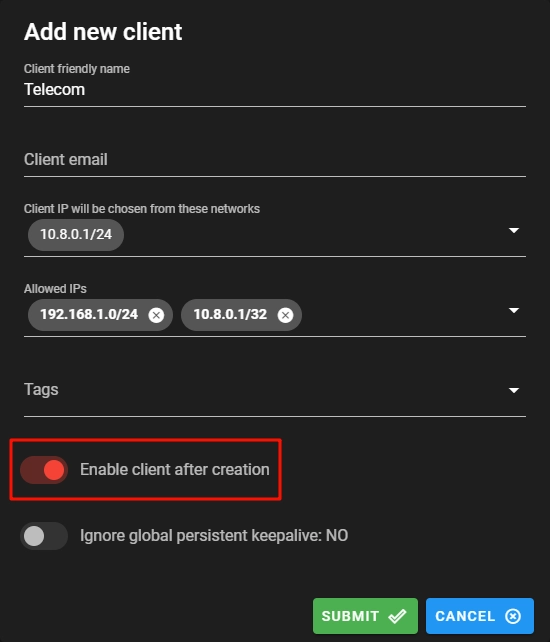
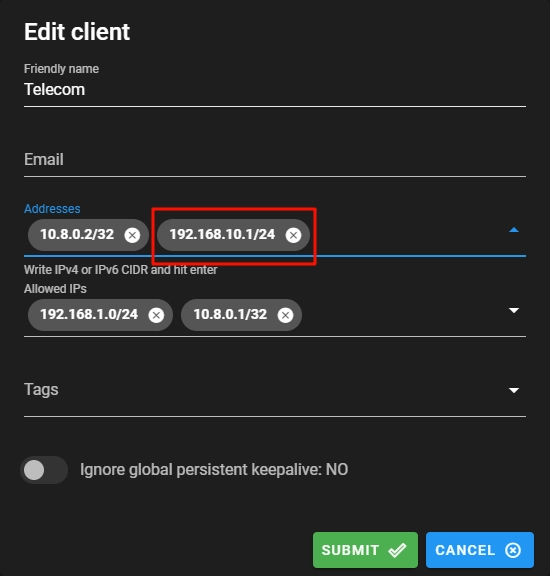
- SUBMIT 之后,还需要重新编辑 client,在 Addresses 中,将这个局域网的网段填入
- 以此类推,将所有的设备都添加进去
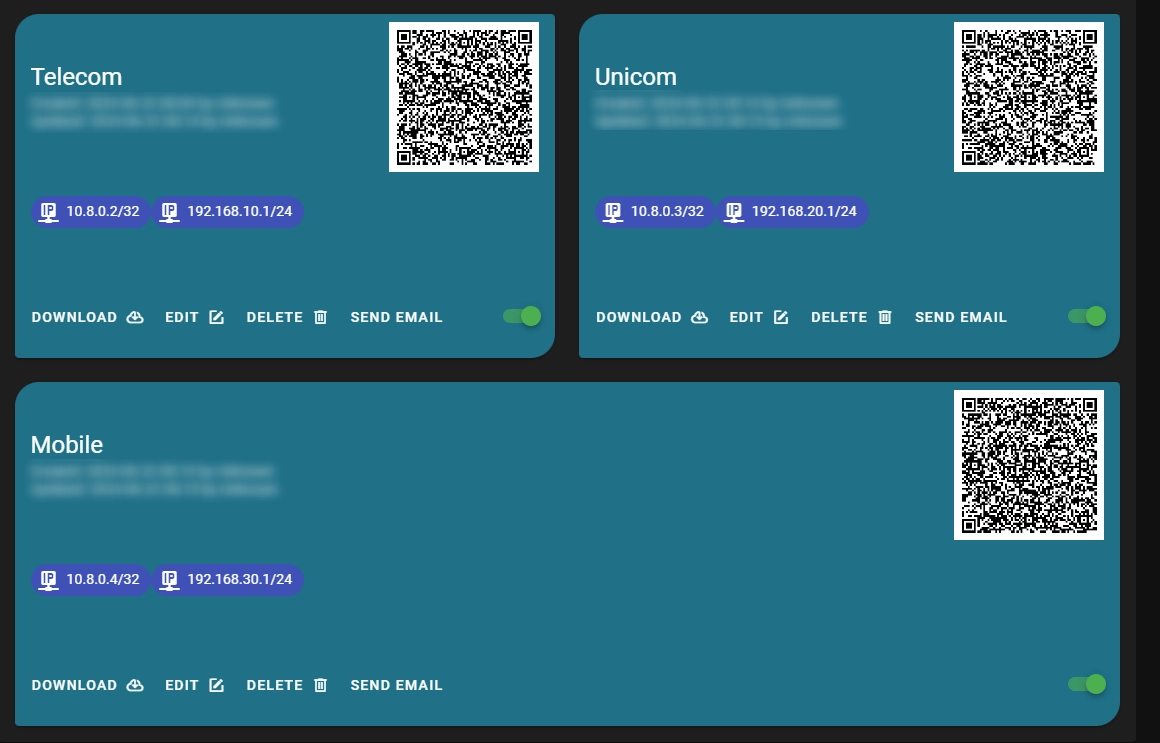
- 此时我们拥有了 4 个配置文件(/etc/wireguard/wg0.conf 以及添加的 3 个 client)
$ cat /etc/wireguard/wg0.conf

# Updated: 2024-06-21 15:55:58.726520374 +0000 UTC / Created: 2024-06-21 15:49:14.217730273 +0000 UTC
[Interface]
Address = 10.8.0.1/24
ListenPort = 51820
PrivateKey = YGCi4Jc/s6Ee32bZVma0YCCtdyRBrVZgmQkURklAAWo=

PreUp = echo WireGuard PreUp
PostUp = iptables -A FORWARD -i wg0 -j ACCEPT; iptables -A FORWARD -o wg0 -j ACCEPT; iptables -t nat -A POSTROUTING -o eth0 -j MASQUERADE
PreDown = echo WireGuard PreDown
PostDown = iptables -D FORWARD -i wg0 -j ACCEPT; iptables -D FORWARD -o wg0 -j ACCEPT; iptables -t nat -D POSTROUTING -o eth0 -j MASQUERADE
# Mobile /  / Updated: 2024-06-21 16:15:39.748815304 +0000 UTC / Created: 2024-06-21 16:15:25.886155585 +0000 UTC
[Peer]
PublicKey = LM5i7HeNb34G5Iz3S9274fcxMuTKu6NjkDVX8SLcKjA=
PresharedKey = g8HATK7UubyXaeSE9C8sTxumC7CygXdT766rrh3cMwg=
AllowedIPs = 10.8.0.4/32, 192.168.30.1/24

# Unicom /  / Updated: 2024-06-21 16:15:07.982827913 +0000 UTC / Created: 2024-06-21 16:14:18.237769971 +0000 UTC
[Peer]
PublicKey = ex6mAFjEx957kOly9Y573Km4PGKrXEbXmPBkL8smvHw=
PresharedKey = mSmNqhZU+GuimDnttFXSAWqZLrvmzTh5VNIuCmsnPQA=
AllowedIPs = 10.8.0.3/32, 192.168.20.1/24

# Telecom /  / Updated: 2024-06-21 16:14:46.592117942 +0000 UTC / Created: 2024-06-21 16:04:04.079557319 +0000 UTC
[Peer]
PublicKey = GPPw22ARd6l1j7ePVR9eOu4jjPW7yvh8HjN+zZc78Xk=
PresharedKey = 1w8XilKRTtFESHEEtTwq8+Va5UvSYDLVdkx+ICR/Bn0=
AllowedIPs = 10.8.0.2/32, 192.168.10.1/24$ cat Telecom.conf
[Interface]
Address = 10.8.0.2/32, 192.168.10.1/24
PrivateKey = OK8ec/Qk1S8qIO/nSZzXgBcQlqtXB8YJComokZJGP08=
[Peer]
PublicKey = mEiW28urmgzkH0rSXory44z32I/1qoBwIclnEUNeGVg=
PresharedKey = 1w8XilKRTtFESHEEtTwq8+Va5UvSYDLVdkx+ICR/Bn0=
AllowedIPs = 192.168.1.0/24, 10.8.0.1/32
Endpoint = ddns.domain.com:51820- 将
wg0.conf中Unicom与Mobile复制到Telecom.conf中[Interface]删除 Address 并添加 PostUp 与 PostDown[Peer]删除Unicom与Mobile的PresharedKey并添加 Endpoint
[Interface]
Address = 10.8.0.2/32 // [!code highlight]
PrivateKey = OK8ec/Qk1S8qIO/nSZzXgBcQlqtXB8YJComokZJGP08=
PostUp = iptables -A FORWARD -i wg0 -j ACCEPT; iptables -A FORWARD -o wg0 -j ACCEPT; iptables -t nat -A POSTROUTING -o eth0 -j MASQUERADE
PostDown = iptables -D FORWARD -i wg0 -j ACCEPT; iptables -D FORWARD -o wg0 -j ACCEPT; iptables -t nat -D POSTROUTING -o eth0 -j MASQUERADE

[Peer]
PublicKey = mEiW28urmgzkH0rSXory44z32I/1qoBwIclnEUNeGVg=
PresharedKey = 1w8XilKRTtFESHEEtTwq8+Va5UvSYDLVdkx+ICR/Bn0=
AllowedIPs = 192.168.1.0/24, 10.8.0.1/32
Endpoint = ddns.domain.com:51820

# Mobile /  / Updated: 2024-06-21 16:15:39.748815304 +0000 UTC / Created: 2024-06-21 16:15:25.886155585 +0000 UTC
[Peer]
PublicKey = LM5i7HeNb34G5Iz3S9274fcxMuTKu6NjkDVX8SLcKjA=
PresharedKey = 1w8XilKRTtFESHEEtTwq8+Va5UvSYDLVdkx+ICR/Bn0= // [!code --]
AllowedIPs = 10.8.0.4/32, 192.168.30.1/24
Endpoint = ddns.mobile.com:51820 // [!code ++]

# Unicom /  / Updated: 2024-06-21 16:15:07.982827913 +0000 UTC / Created: 2024-06-21 16:14:18.237769971 +0000 UTC
[Peer]
PublicKey = ex6mAFjEx957kOly9Y573Km4PGKrXEbXmPBkL8smvHw=
PresharedKey = 1w8XilKRTtFESHEEtTwq8+Va5UvSYDLVdkx+ICR/Bn0= // [!code --]
AllowedIPs = 10.8.0.3/32, 192.168.20.1/24
Endpoint = ddns.unicom.com:51820 // [!code ++]- 以此类推,将
Unicom.conf与Mobile.conf做同样的处理
启动 WireGuard
wg-gen-web 只是一个帮助我们生成配置文件的工具,并不能直接启动 WireGuard
要想通过命令启动 WireGuard,首先需要安装 wireguard-tools 工具包
apt install wireguard-tools启动 WireGuard 可以使用以下命令
wg-quick up wg0关闭 WireGuard 可以使用以下命令
wg-quick down wg0如果需要查询当前的连接状态,则可以使用
wg show wg0每一个 Peer 启动也是如此,将 Telecom.conf 重命名为 wg0.conf 上传至 /etc/wireguard 目录中,启动即可
关于局域网开放 UDP 51820 端口,以及 Android 与 Windows 客户端的使用,可以参考上篇文章通过 WireGuard 与 IPv6 异地组网 实现远程访问局域网

